git
Git是目前世界上最先进的分布式版本控制系统,所有的版本控制系统,只能跟踪文本文件的改动,而无法跟踪二进制文件的改变。
安装和配置
- 安装(cetos7为例)
1
2
3
yum install git
<!-- 验证 -->
git --version - 配置
1
2
3
4
5
6
7
8
9
10
11
12
13
14
15
<!-- 账号和邮箱 -->
git config --global user.name "jesonlin"
git config --global user.email "jesonlin@outlook.com"
<!-- 颜色 -->
git config --global color.ui true
<!-- 设置别名 -->
git config --global alias.st status
git config --global alias.ci commit
git config --global alias.br branch
<!-- 撤销暂存区git reset HEAD file -->
git config --global alias.unstage 'reset HEAD'
git config --global alias.last 'log -1'
git config --global alias.lg "log --color --graph --pretty=format:'%Cred%h%Creset -%C(yellow)%d%Creset %s %Cgreen(%cr) %C(bold blue)<%an>%Creset' --abbrev-commit" - 查看配置信息
1
2
3
4
5
6
7
git config --list
<!-- 每个仓库下的配置位置 -->
.git/config
<!-- 全局配置位置 -->
~/.gitconfig - 忽略特殊文件
1
2
3
4
5
6
7
8
9
10
11
12
13
14
15
16
17
vim .gitignore
<!-- 官方提供各类忽略文件模版 -->
https://github.com/github/gitignore
<!-- 在线生成.gitignore -->
https://gitignore.itranswarp.com/
<!-- 检查某个文件被哪条规则忽略 -->
git check-ignore -v <文件名>
<!-- 被忽略情况下强制提交 -->
git add -f <文件名>
<!-- 不排除某些文件 -->
vim .gitignore
!.gitignore
常用方法
- 版本库
1
2
3
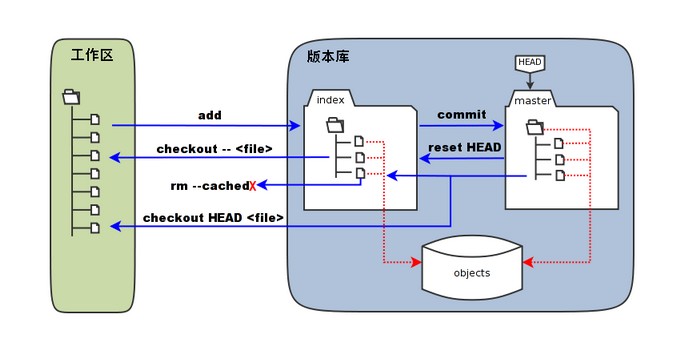
工作区:就是你在电脑里能看到的目录。
暂存区:英文叫 stage 或 index。一般存放在 .git 目录下的 index 文件(.git/index)中,所以我们把暂存区有时也叫作索引(index)。
版本库:工作区有一个隐藏目录 .git,这个不算工作区,而是 Git 的版本库。
1
2
3
4
5
6
7
8
9
10
11
12
13
14
15
16
17
18
19
# 针对工作区的修改
1. git add: 将工作区修改添加到暂存区
<!-- 添加/删除指定文件 -->
git add/rm <file>
<!-- 添加新文件/修改过的文件,不包括删除文件 -->
git add .
<!-- --update update tracked files 添加有更新变化的被追踪的文件,不包括新添加的文件 -->
git add -u
<!-- --all,添加所有修改和新增的文件 -->
git add -A .
2. git checkout: 撤销工作区修改,将暂存区覆盖工作区
<!-- 撤销工作区指定文件修改,用暂存区相应内容替换工作区内容 -->
git checkout -- <file>
<!-- 撤销工作区所有修改,用暂存区替换工作区,不影响新增 -->
git checkout .1
2
3
4
5
6
7
8
9# 针对暂存区的修改
3. git commit: 将暂存区修改添加到版本库
git commit -m "初始化"
4. git reset: 撤销暂存区修改,将版本库覆盖暂存区
<!-- 版本库覆盖暂存区<文件> -->
git reset HEAD <file>
<!-- 版本库覆盖暂存区和工作区<文件> -->
git reset --hard HEAD <file> - 查看提交日志/命令
1
2
3
4
5<!-- 提交日志 -->
git log --pretty=oneline
<!-- 所有命令(包含回退/前进) -->
git reflog - 版本回退/前进
1
2
3
4
5
6
7
8
9
10
11
12
13<!-- --hard 表示工作区和暂存存都重置,无则表示只重置暂存区 -->
<!-- 回退上个版本 -->
git reset --hard HEAD^
<!-- 回退上个版本,保留修改 -->
git reset --soft HEAD^
<!-- 回退前10个版本 -->
git reset --hard HEAD~10
<!-- 跳转到指定版本(包括回退和前进,只要记得commit的id) -->
git reset --hard 【COMMIT_ID】 - 比较差异
1
2
3
4
5
6
7
8<!-- 比较工作区和暂存区的修改 -->
git diff <文件名>
<!-- 比较工作区和上一次commit后的修改 -->
git diff HEAD <文件名>
<!-- 比较暂存区和上一次commit后的修改 -->
git diff --cached <文件名>
分支管理
- 查看分支
1
2<!-- 查看分支(-a 包括远端分支) -->
git branch -a - 创建分支
1
2
3
4
5
6
7
8
9
10<!-- 创建分支 -->
git branch <新分支名>
<!-- 切换分支 -->
git checkout <新分支名>
git switch <新分支名>
<!-- 创建并切换到分支 -->
git checkout -b <新分支名>
git switch -c <新分支名> - 推送分支
1
git push origin <本地分支名>:<远端分支名>
- 删除分支
1
2
3
4
5
6<!-- 删除本地分支 -->
git branch -d <本地分支名>
<!-- 删除远端分支 -->
git push origin :<远端分支名>
git push origin --delete <远端分支名> - 合并分支
1
2
3
4<!-- 默认使用Fast forward,看不出来曾经做过合并 -->
git merge <待合并的分支名>
<!-- 使用普通模式,可以看出曾经合并过 -->
git merge --no-ff -m "" <待合并分支名>
- 分支冲突
1
2
3
4
5
6<!-- Git用<<<<<<<,=======,>>>>>>>标记出不同分支的内容 -->
<!-- 手动修改后提交 -->
git add
git commit -m
<!-- 查看提交日志 -->
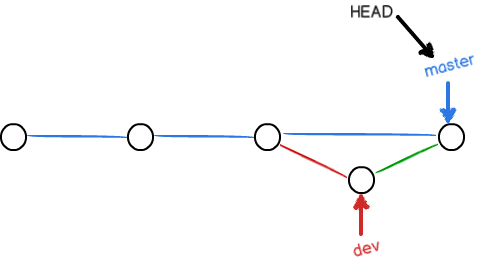
git log --graph --pretty=oneline --abbrev-commit - 分支策略
- master分支是主分支,因此要时刻与远程同步;
- dev分支是开发分支,团队所有成员都需要在上面工作,所以也需要与远程同步;
- bug分支只用于在本地修复bug,就没必要推到远程了;
- feature分支是否推到远程,取决于你是否和你的小伙伴合作在上面开发。

实际开发(分支、多人开发冲突)
- 分支基本情况
master
dev(当前已有修改) - stash (保存现场)
临时需要修复bug1
2
3
4
5
6
7
8
9
10
11
12
13
14
15
16
17
18
19
20
21
22
23
24
25
26
27
28
29
30
31
32
33<!-- 1. 保存dev现场 -->
git stash
<!-- 2. 切换到master分支 -->
git checkout master
<!-- 创建临时修复bug分支 -->
git checkout -b issue-101
<!-- 提交修改 -->
git add -A .
git commit -m "fix buf 101"
<!-- 切换到master分支 -->
git checkout master
<!-- 合并bug分支 -->
git merge --no-ff -m "merge bug fix 101" issue-101
<!-- 切换回dev分支 -->
git checkout dev
<!-- 查看之前保存的现场 -->
git stash list
<!-- 还原旧的现场 -->
git stash apply
<!-- 还原旧的指定现场 -->
git stash apply stash@{0}
<!-- 删除旧的现场 -->
git stash drop
<!-- 还原并删除 -->
git stash pop - cherry-pick (重放bug修复到dev分支)
1
2
3
4
5
6
7
8
9
10
11
12
13
14
15
16
17
18
19
20<!-- dev 提交bug修复的提交id -->
git cherry-pick <bug分支上修复bug的commit_id>
<!-- cherry-pick 重放指定提交 -->
a - b - c -d master
|
e - f - g dev
git checkout master
git cherry-pick f
<!-- 将dev的f提交重放到master分支 -->
a - b - c -d - f master
|
e - f - g dev
<!-- cherry-pick 重放指定多个提交 -->
git cherry-pick <A-commit_id> <B-commit_id>
<!-- cherry-pick 重放指定多个连续提交(A,B] -->
git cherry-pick <A-commit_id>..<B-commit_id>
<!-- cherry-pick 重放指定多个连续提交[A,B] -->
git cherry-pick <A-commit_id>^..<B-commit_id> - 多人协作
1
2
3
4
5
6
7
8
9
10
11
12<!-- 1. 试图推送自己的修改 -->
git push origin <分支名>
<!-- 2. 如果推送失败,使用pull试图合并 -->
git pull
<!-- 如果pull提示没有tracking,则关联本地和远程分支名 -->
git branch --set-upstream-to <本地分支名> origin/<远程分支名>
<!-- 3. 如果合并有冲突,解决冲突并提交 -->
<!-- 4. 没有冲突或者冲突解决后,推送 -->
git push origin <分支名> - rebase (变基操作把本地未push的分叉提交历史整理成直线)
1
2
3
4
5
6
7
8
9
10
11
12
13
14
15
16
17
18
19origin/master a - b - c
|
local/master d - e
<!-- 1. 本地已有1+未push得提交 -->
(d 和 e)
<!-- 2. 直接提交会报冲突 -->
git push
<!-- 3. 先把c拉取到本地 -->
git pull
<!-- 4. 此时本地提交比远程超前3个提交 -->
git log --graph --pretty=oneline --abbrev-commit
<!-- 5. 变基,改变本地两个未提交和远程新提交顺序-->
git rebase
原本分叉的提交现在变成一条直线了,Git把我们本地的提交“挪动”了位置,放到远程新提交的后面,符合整体变更顺序。

标签(版本库快照。)
- 标签
1
2
3
4
5
6
7
8
9
10
11
12
13
14
15
16
17
18<!-- 查看标签列表 -->
git tag
<!-- 查看标签 -->
git show <标签名>
<!-- 打标签 -->
git tag -a <标签名> -m "xxx" <commit_id>
<!-- 推送指定/所有标签 -->
git push origin <标签名>
git pusH origin --tags
<!-- 删除本地标签 -->
git tag -d <标签名>
<!-- 删除远程标签 -->
git push origin :refs/tags/<标签名>
仓库
- 创建本地仓库
1
2
3
4
5
6mkdir project
cd project
git init
touch README.md
git add README.md
git commit -m "init git" - 远程仓库
- 本地仓库关联远程仓库
1
2
3
4
5
6
7
8<!-- 本地仓库关联远程仓库 -->
git remote add origin git@github.com:linjinzhong/blog.git
<!-- 解除关联 -->
$ git remote rm origin
<!-- 推送 -->
$ git push -u origin master - 克隆远程仓库
1
2
3
4
5
6
<!-- 克隆远程仓库,默认只有master分钟 -->
git clone git@github.com:linjinzhong/blog.git
<!-- 克隆后希望拉取非master分支 -->
git checkout -b dev origin/dev
<!-- 直接克隆非master分钟 -->
git clone -b ac git@gitlab.yopoint.vip:ac/YoPointSwift.git - 权限
1
2
3
4
5
6
7
8
9
10ssh-keygen -t rsa
<!-- 一路回车 -->
ll /root/.ssh/
<!-- 将/root/.ssh/id_rsa.pub内容拷贝到git上 -->
cat /root/.ssh/id_rsa.pub
<!-- git ssh地址 -->
https://github.com/settings/keys
- 本地仓库关联远程仓库
REFERENCE
------------->本文结束感谢您的阅读-------------
